Thursday, December 9, 2010

Christmas decorating

I LOVE decorating for Christmas!!!!!!! I was in withdrawals - we had Thanksgiving at our house so I had to wait to start my decorating...it was killing me! Okay, not literally. But it did set me back a bit as it usually takes a good, solid week (or more) to get the decorating done. I decorate pretty much every square inch of my house, and it seems to be an ongoing process of changing, adding, moving, etc. It took me forever to get my mantel just right this year and I really love how it came out.
Kitchen - love having lights everywhere!
Other side of kitchen - had to crop out the dirty dishes. ;)

Dining room

I had an old frame that I painted red and distressed. Printed out the 1st and 3rd verses to my favorite Christmas Carol. The ribbon behind it is jute upholstery webbing, then topped with a sprig of fake pine and a pinecone. Love it!

Another thing that took forever, the coffee table. The candles are my Pottery Barn knockoffs - printed out sheet music, wrapped around battery-operated candles and used antiquing inks - love them! The nativity candleabra I've had forever but this year I did a dark paint wash on it and like it better than the light wood.

Living room shelving

Dining room - this is the "family" tree, all the ornaments given to us, or the kids made, or we picked out on a trip...the kids decorated this one entirely by themselves this year.

I was happy to find a new home for this sign - I used to put it on my kitchen cabinets but it wasn't doing it for me this year - I like it here. Please excuse the toilet in the background.

I wish I could put lights on the stairwell but there are no outlets anywhere nearby - maybe someday I'll get a lot of battery-operated strands and light 'er up.

I got this nativity years ago at Sams Club...only recently did I realize the "shepherd" looks more like the Pied Piper. Weird.

Entryway

This makes me want to collect more white pitchers. :)
A couple years ago, my grandmother gave me a big box of a lot of her ornaments that she's gathered over the years, many of them belonged to HER mother. I love these. I'm amazed that so many of them have survived packing/unpacking, decorating/undecorating, moving, earthquakes and grandchildren. Our main tree (always a real tree) is now entirely decorated with these ornaments and I love the look of it. I do have a few favorites:

Cute, isn't he? There are actually 2 of these

Quite of few of this type with the inset - amazing they are still in one piece as they are very fragile

Another favorite

"Look Daddy, teacher says every time a bell rings, an angel gets their wings!" Doesn't it look just like the one in the movie? And yes, it rings.

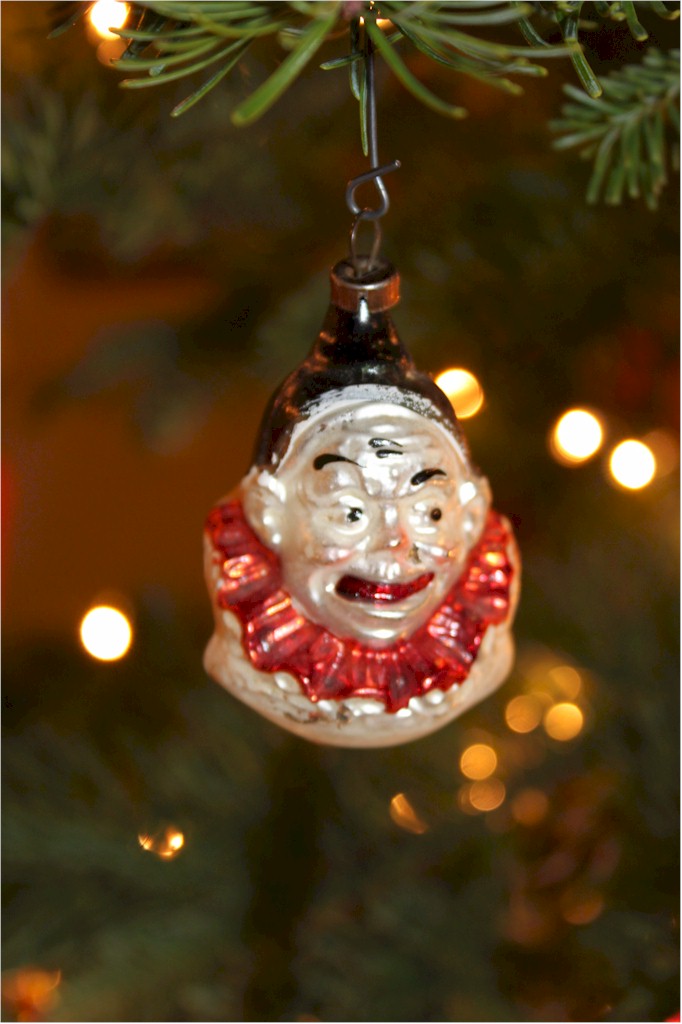
THIS is an example of one I do NOT like. Creepy, isn't it? I don't care for clowns anyway and this one has a freaky grin. There are 2 of these but one is broken. Too bad.

My angel tree - my grandmother always collected angels, so I decided to put them all together on one tree

Our tree! Love the simple, old-fashioned look - especially knowing all those ornaments have such a long history in my family

My kitchen tree - still need to make some salt dough ornaments for it as it just isn't "done" to me
The mantel - love how it turned out this year

A close-up of the mantel

I also do more trees upstairs - our playroom and the master bedroom...and the girls both have a small tree in their rooms. I'm just too lazy to take pictures. Plus I'm completely changing up that decor for next year - the playroom is going to be a snowman theme and I will move the snowflakes/crystals/silver decor into our bedroom since I plan to do a minor re-decor in there this year. (shhh, don't tell my hubby). I wish I could leave it all up year round, it makes me so happy!

Wednesday, November 24, 2010

Fall/Thanksgiving mantel

I like how my fall mantel turned out this year, and I just finally took a picture of it...right before I take it all down Friday morning to replace with Christmas decor!
The banner was simple - I printed the letters backwards on cardstock, cut them out and adhered to 8x8 pieces of cardstock, then used a leaf punch on some assorted papers/cardstock. Punched holes in the corners of the squares and threaded them with chocolate brown satin ribbon. Done! The pumpkin on the mantel is one of those simple toilet paper pumpkins - toilet paper, plastic grocery bags, fabric and a rolled up paper lunch bag for the stem. And the snow outside the window adds a nice touch, don't you think? Western WA got hit with an early snowfall and cold temps (for us) - about 6+ inches and temps down in the teens made for some icy roads and cancelled school for 2 days - yay!
Happy Thanksgiving - hope everyone has a safe and blessed celebration with their loved ones.


Saturday, October 23, 2010

Jack-o-Lanterns


I love these! Every year when I get our fall decor, I'm always so happy to see these little guys. And I think we need to make more as Ainsley was too little to make them and she's sad that none of them are "hers". Simple craft! Terra cotta pots in different sizes, yellow construction paper, Mod Podge, branches and hot glue. Cut faces or letters out of the construction paper, adhere with Mod Podge, then give the entire outside of the pot a final coat of Mod Podge to seal. Cut branches to length and use hot glue to attach to the hole in bottom (top) of pot. I just love the crazy faces that Hayley made. :)

Fall subway art


I have been seeing subway art all over the internet and really wanted one for fall to put on my dining room sideboard. Michael's had 2-packs of art canvases on 40% off so I think I only paid $8 for 2 of them, and they're pretty large - 18x24. I painted the entire canvas with chocolate brown paint, it needed a couple of coats, although I did like it slightly streaky so I wish I had left it that way but oh well. I planned to use my Silhouette craft cutter for the letters but I couldn't figure out how to get the letters in different sizes and widths, so I formatted it in Publisher, printed on white cardstock and cut them out. Since I used a simple, clean font (Arial MT Black) they were simple to cut out, maybe only took 30 minutes. Lining them up and spacing them was a little more tricky - I used a ruler and painters tape to line it all up. Then used Mod Podge to adhere the letters. I was going to seal it with Mod Podge but ended up leaving it alone. I'm really happy with how it came out and plan on making a Christmas one to go in that space.

Bathroom Re-Do

Our downstairs powder room was never quite "done". I had originally painted it the same color as our kitchen/dining room, which is a deep gold color, but it just never was quite what I wanted. Plus I couldn't STAND the pedestal sink! It's a tiny bathroom and had no place for storage...and I was tired of toilet paper in the baskets on the wall. So a friend inspired me to do kind of an antique look. I decided I wanted to do a light olive green on the walls, and we replaced the pedestal sink and ugly faucet with a new cabinet & bronze faucet. Added an old window and some old accessories and I LOVE it. We still need to make a frame around the mirror and I'm trying to make the letter G work in there a bit better, but I just love how it came out! The paint color is Ryegrass by Behr. I might put a big, deep red flower on the G and hang it up.
I think Dan was a little nervous to pull out the old sink and install the new cabinet and faucet, but he did an awesome job!

I found an old mason jar with the zinc lid, drilled a hole in the top and put in a pump, filled it with soap - love it!

The letter G was a big cardboard letter I bought at Joann's. I used an old book and some Mod Podge and covered the entire thing. Before I sealed it, I used some ink pads and a sponge to make it look more aged, then coated the entire thing with more Mod Podge.

Monday, September 27, 2010

Reupholstered chair

This was a fun project and I love how it turned out! I found this chair at the thrift store and wanted it for my master bath that we were repainting - the best part is that when I tried to purchase it, my credit card kept crashing their computer so the guy finally gave me 50% off if I paid with cash. Sweet! Only $13 for the chair. Taking the material off was the hardest part - there must have been 500 staples on that thing and I ended up with a bruised hand and cuts all over my fingers from removing it. And the fabric was nasty and covered in pet hair so I was glad to get all of it off. Found some fun leopard fabric, some cording and fringe and gave it a whole new look. My upholstering skills are not the best and had to use a lot of hot glue but I think it came out great and now I have a fun little chair in the bathroom. :) Eventually I'll post some pics of the bathroom re-do but it's not finished - though you can see the fun paint color behind the chair.

BEFORE


AFTER

Friday, June 4, 2010

American Girl Doll beds

I have been promising to make doll beds for my girls' American Girl dolls FOREVER. Always seemed to have something else consuming my time, but now that MOPS is done my time is freed up, as is my mind. :) I think my husband was skeptical that we could build these since we had NO plans at all, and not a great deal of woodworking skills but I was determined to do it. So we looked at photos and the girls picked out what they wanted, bought the materials and voila! I love how they came out! The girls of course picked out their own bedding material and those were easier than I expected. I think we probably spent less than $50 total for both beds, spray paint, foam, and fabric. Not bad considering we would have spent WAY more than that for just one if we'd purchased them. Next project is to make armoires for them to store all the doll accessories. THAT I have plans for rather than trying to wing it. ;)

Monday, March 8, 2010

I Sewed Something!

I am pretty impressed with myself! Sewing is NOT my gift. At all. Ask anyone. But I am determined to at least learn enough to make some simple things. I really wanted a small runner to put on my kitchen island, something green and spring-y looking. So I found some cute fabric and just dove in and did it. And it worked! I probably should have taken a better picture, but I was too lazy. ; )  Anyway, the runner is padded (quilted?) and I used some plain muslin for the reverse side - I also rounded the ends, which was really tricky. I sewed it together inside out with the batting, then turned it right side out, finished sewing it shut and then sewed again around the entire thing to give it a flat, finished edge. Yay me! I love how it turned out and can't wait to try something else!

Spring Wreaths

I think wreaths are becoming a new favorite of mine! I saw THIS idea and loved the simplicity of it. It was actually REALLY easy, especially once I figured out how to get the most circles punched out of each lunch bag. I love how this came out! (sorry for the horrible pictures, but my "good" camera died literally as I was trying to take these pictures - ugh!)

As for the slight differences in mine, my craft punch was more like 3" and I got 12 circles punched per lunch bag, and probably used about 10 or 12 bags? The butterflies were cut from some scrap paper and an old book - I used some ink to antique the edges and then used modge podge on them as the book paper was really thin and tore easily. I hot glued the butterflies to the wreath. And when gluing on the paper circles, I found it was easiest to make them into flowers (see the original post) and then glue 3 or 4 at a time. The only cost was the dollar store wreath. I had all the other supplies in my craft stash. Love how it looks hanging on my wall with some other spring decor! (yikes, these pics are so so bad, it really looks better in person, I promise!!!)
After I made the paper bag wreath, I was outside cutting the dead blossoms off my huge hydrangea bush. As they piled up, I realized they had the same look as the paper bag "blossoms". So I purchased a large grapevine wreath for a couple bucks and stuck the dead blossoms in the grapevine, then hung it on my front porch. I really love how it came out! (again, horrible picture, sorry)  And if it gets ruined from the wind, I can pull the blossoms out and do something different, or put fresh ones in there this summer.

Valentine's Frames

Terrible picture, I know, but they look really cute in person! These XOXO Frames are another cute idea from Tatertots & Jello. So easy too! I had to add the little velvet bow because I couldn't fit one more marble in the O but I like how it came out. I used hot glue for the marbles, and obviously only one row instead of multiple. Used one bag of the clear, floral marbles (not the flat-backed kind), frames from the Dollar Tree spray-painted black, and paper was on sale today for 25 cents each - bonus! And since the paper is over the glass, you can reuse these for something else - maybe I'll make something spring-y to put in them after February is over...like THIS!

Valentine's Wreath

I have been spending way too much time doing the everyday mundane chores, and have been really want to do some crafting. I came across this cute Valentine's wreath idea from Tatertots & Jello. It's made out of cupcake liners! I love how it came out, although I may change the ribbon, it kind of looks like a funeral wreath with the ribbons hanging behind it. Not sure yet. :) All the directions are at the above link - I used about 60-62 cupcake papers. The 8" wreath form I got from the Dollar Tree. I found the cupcake liners at Michael's in a dollar bin, 48 in a package. I love how this turned out! More crafting to come...
In trying to be a little more organized AND give myself some more motivation, I thought I would start this craft blog to show some projects I have been and will be working on. By no means are any of my ideas "new"! Why reinvent the wheel, right? There are plenty of fabulous ideas out there that I want to attempt, and will usually give it my own spin. The list of ideas is piling up so I am anxious to get crafting!